TMC Plugins
EssentialAlso in ProGPU

TMCColorGrading 2

A stack-based color grading plugin that layers any of 28 modules in the order you want

A color grading plugin built around a module stack: you stack the grading modules you need in the order you want, and it renders them in that order. You can add modules, reorder them, turn them off or delete them, and adjust their values right in the Effect Controls panel, without opening the Edit Look 2 window. It is a separate effect from TMC ColorGrading (the original), so you can install both and use them in the same project.

Effect menu
Effect › TMC › TMC ColorGrading 2
Acceleration
GPU + CPU
Color depth
8 · 16 · 32 bpc
Multi-Frame Rendering
Supported

Key features

01

A stack of 28 module types in any order

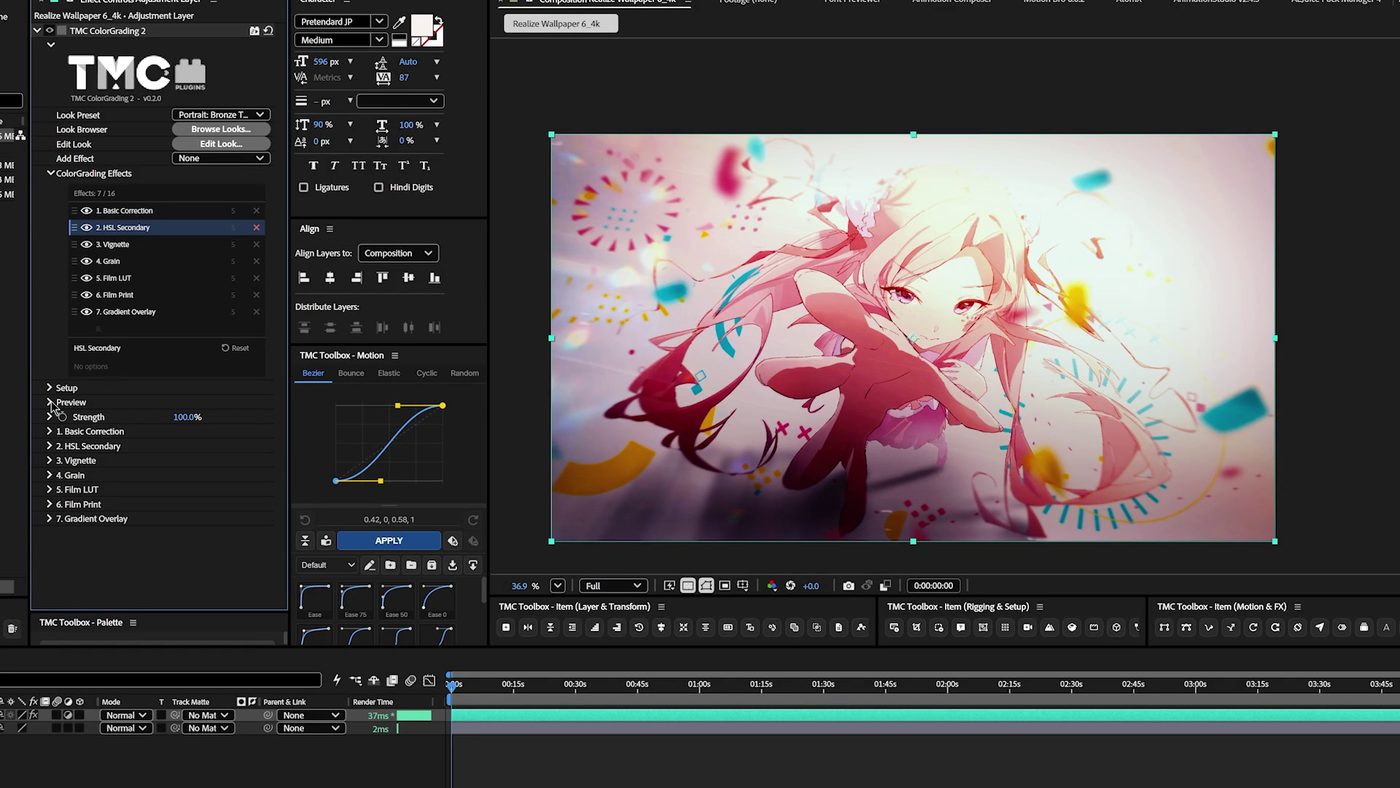
From 28 module types, including Basic Correction, Color Wheels, Curves, HSL Secondary, Teal & Orange, Film LUT, Film Print, Grain, Halation, Vignette, Lens Distortion, and Qualifier (HSL Key), use Add Effect to pick the ones you need and stack up to 16; they render in the order they're stacked. In the ColorGrading Effects list, drag a row to reorder, turn modules on and off, and click a row's S to solo it (Ctrl+click, or Cmd+click on macOS, adds it to the solo). Each module has Enabled and Strength (0–100%), and the effect as a whole has its own Strength too.

02

Edit in Effect Controls without Edit Look 2

Modules with a widget draw it inside the slot, such as Wheels, Curves with Bezier handles, Hue Curves, HSL, Duotone, Gradient, or Color Map, so you can edit it right in the panel, and every slider, color, and point can be keyframed (keyframes on rows starting with Selected, such as Selected Stop Color, aren't used in the render). Choices such as Blend, Style, LUT, and Texture are made on the Options row, and the More menu (⋯) has Duplicate, Rename..., Move Up / Move Down, Reset Effect, and Delete.

03

334 looks and the Browse Looks window

Of the 334 factory looks in 37 sections, 104 are the original plugin's looks converted to stacks, and 230 are new looks built around color filters, film stocks and prints, black and white, anime scenes, cinema lenses, mood lighting, shooting conditions, genres, eras, emotions, log footage, and more. Choose one in the Look Preset popup, or in the Browse Looks... window while viewing thumbnails rendered on your own footage. The look you choose comes in as a module stack, so you can change any slot.

04

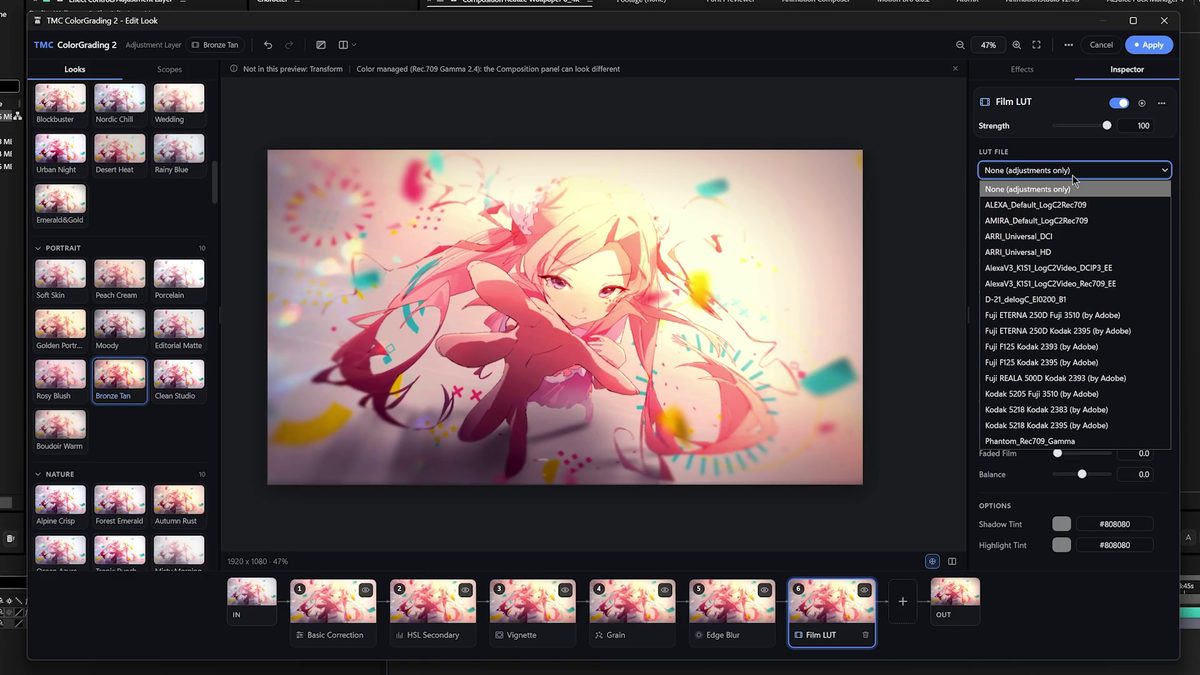
The Edit Look 2 editor window

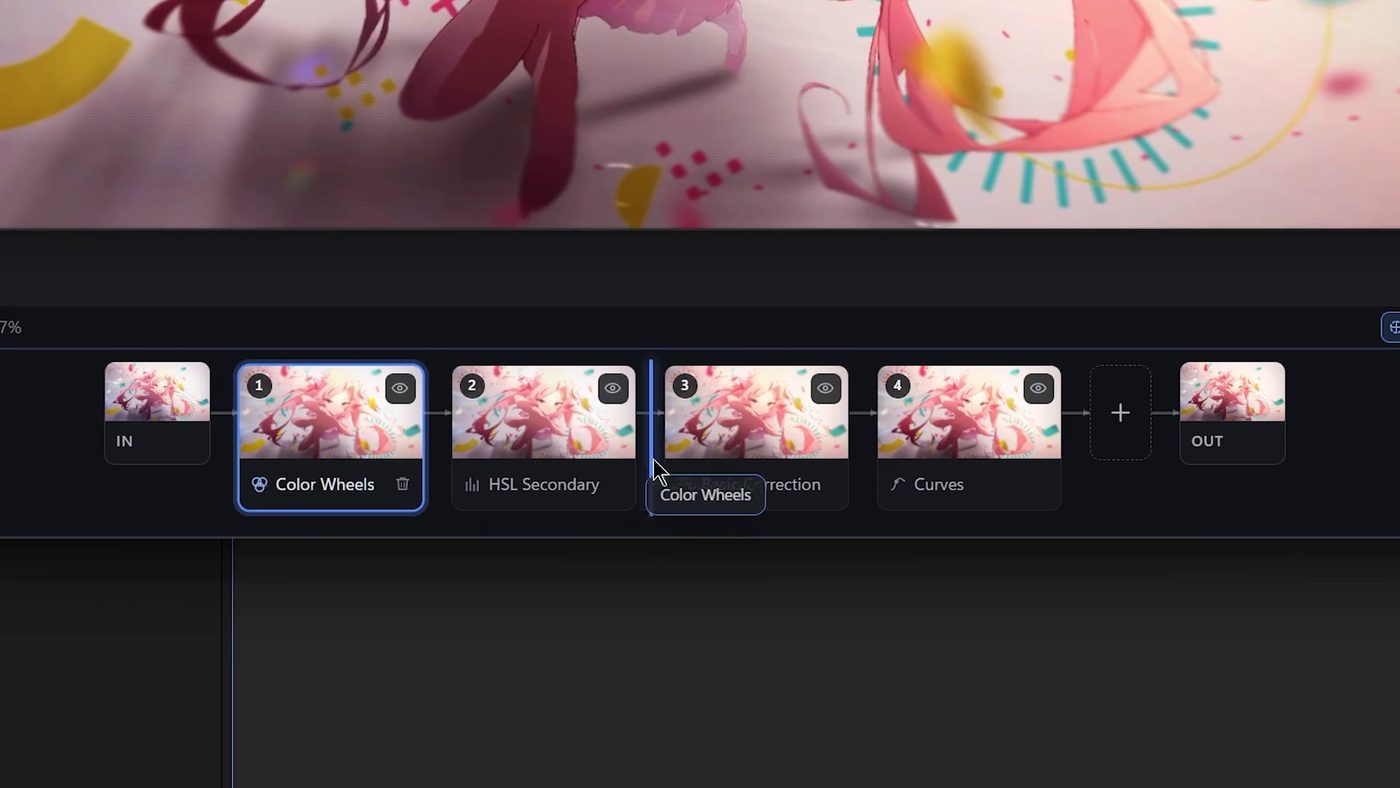
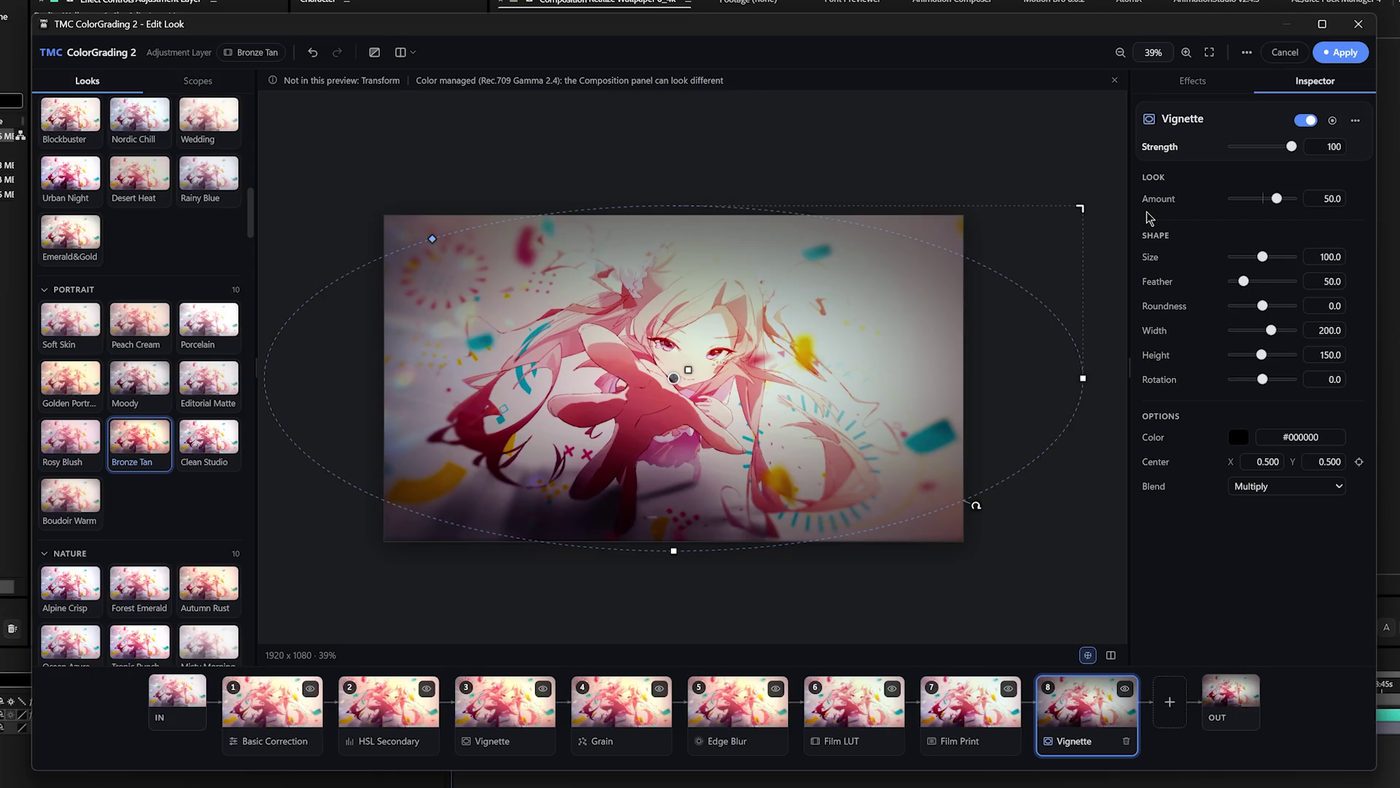
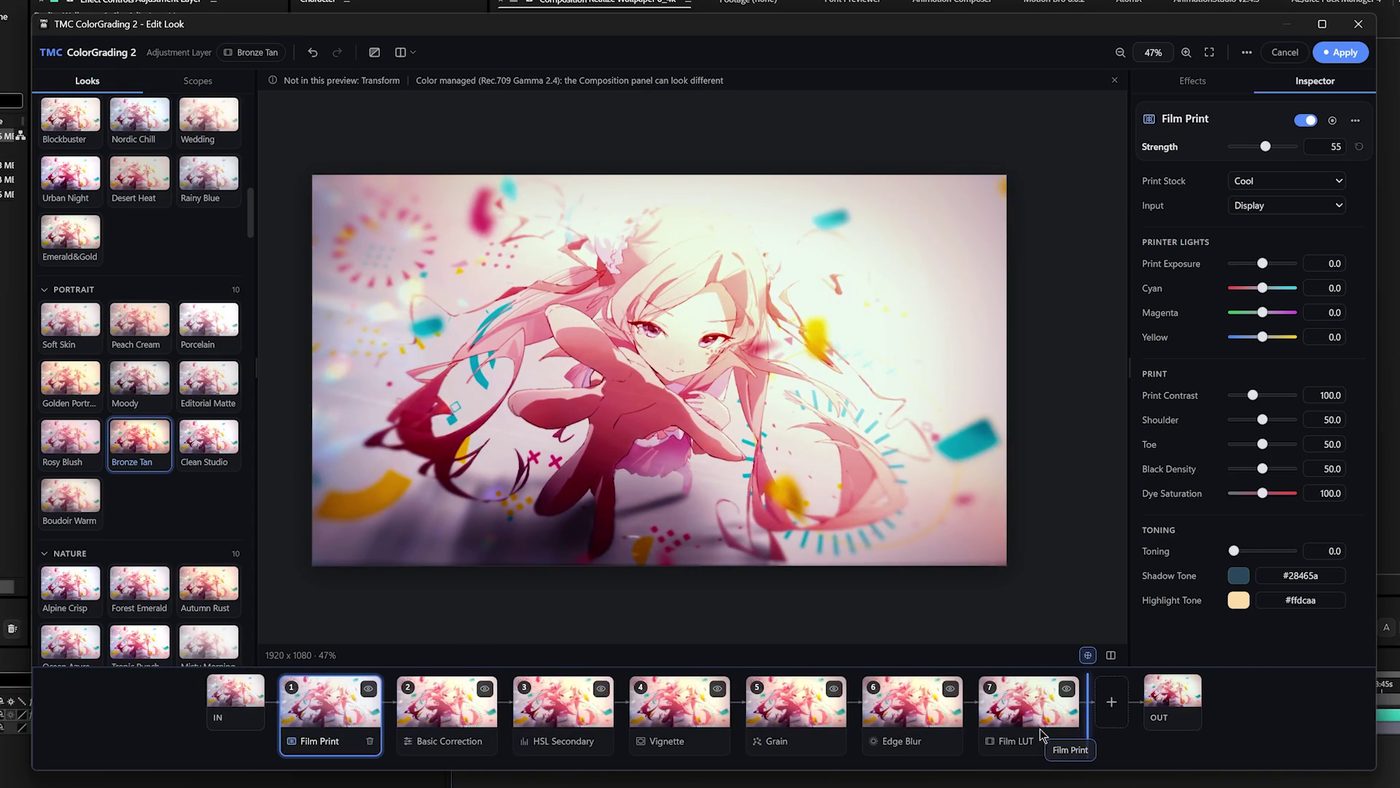
An editor window that opens from the Edit Look... button. The rail at the bottom lays out the stack from IN to OUT as a thumbnail for each stage, which you drag to reorder, and the Inspector on the right edits the selected module. The Scopes tab has 7 scopes measured from pre-clamp values, handles on the preview let you drag the Vignette and Edge Blur ellipses and the Gradient Overlay start and end points, and Original and Compare let you check against the original. Save your own stacks as .tmclook2 files.

05

Texture, Gradient Overlay, and Edge Blur, not found in the original

Texture generates 38 textures in 5 groups (Paper, Fabric, Surface, Grunge & Marks, and Sketch) procedurally, with no image files, and with Animate on it draws a new surface every frame. Gradient Overlay draws a gradient with per-stop opacity across the whole frame and composites it with any of 27 blend modes. Edge Blur keeps the inside of an ellipse sharp and blurs the outside with the Blur Type you choose: Gaussian, Fast Box, Bokeh, or Zoom.

Quick start

Follow these steps in order the first time.

  1. Select the layer you want to grade and apply Effect › TMC › TMC ColorGrading 2.
  2. Choose a look in Look Preset, or choose one while viewing thumbnails in the Browse Looks... window. Choosing a look replaces the current stack with that look's modules.
  3. To add a module, choose it in Add Effect. It's added to the end of the stack, and Add Effect goes straight back to None. Drag a row in the ColorGrading Effects list to change the render order.
  4. Each module appears as a slot group named with its render order and module name, like 3. Vignette. New groups are added closed, so expand one to adjust Enabled, Strength, and the sliders, and edit its widget row in place.
  5. To fine-tune in a larger view, open Edit Look 2 with Edit Look..., make your changes while watching the rail, the Inspector, and the scopes, then click Apply. Apply is recorded as a single undo step, and Cancel discards the changes made in the window.
  6. Before rendering, turn off Split Preview in Preview, and click the SOLO badge at the top of the ColorGrading Effects list to clear all solos. Both settings also apply to the final render.

Practical tips

  • Choosing a look replaces the entire current stack with that look. Choose a look first, then add or adjust modules on top of it.
  • Input Gamma, Input Color Space, Output Color Space, Output Gamma, and Gamut Mapping in Setup describe the footage, not the look, so they aren't included in saved looks or presets. Setting Input Gamma to None turns off the whole color management stage.
  • Option choices such as Blend, Style, Mode, Blur Type, LUT, and Texture can't be keyframed. To change a blend mode over time, use two slots and keyframe the Strength of each.
  • Slot parameter names change when you reorder slots (3. Vignette → 4. Vignette), so reference them in expressions by index, not by name. For example: effect("TMC ColorGrading 2")(42)
  • Qualifier (HSL Key) applies its key as a mask only to the per-pixel modules between it and Qualifier End. It doesn't affect Diffuse, Halation, Sharpen, Chromatic Aberration, Lens Distortion, or Edge Blur, and without a Qualifier End it runs to the end of the stack. Show Matte is for checking what you've selected, so turn it off once you've checked.
  • Hover over a tile on the Edit Look 2 rail to see the frame with only the modules up to that tile applied. It's the quickest way to find which module is causing a result you don't like.

Where to use it

  • Apply it over an MV edit, set the tone with a look like Genre: Music Video, then use Add Effect to add Grain and Halation for film texture.
  • On an animated or illustrated MV, apply a look from the Anime Scenes section, such as Anime: Summer Sky or Anime: Magic Hour, to start from a stack with gradient sky light and soft bloom (Diffuse), then fine-tune the Strength of each slot.
  • Lay a paper or sketch texture from Texture, such as Watercolor Rough or Pencil Sketch, over a hand-drawn MV or a lyric video, and turn on Animate for a wavering, hand-drawn feel.
  • For clips shot in a camera log, set Input Gamma and Input Color Space in Setup to match the source and Output Color Space and Output Gamma to match your delivery space, then grade. The looks in the Log Footage section, whose names start with Log:, are used instead of this. They're made for undecoded, flat, Cineon-style log footage, so use them with Input Gamma in Setup set to None, and not on clips you've already decoded in Setup (they don't exactly match a camera's own log, such as S-Log3 or V-Log).

Pairs well with

Technical notes

  • Supports 8, 16, and 32 bpc and Multi-Frame Rendering, and renders on the GPU through the After Effects GPU pipeline (CUDA, OpenCL, Metal) and the plugin's own OpenCL and Metal path. When needed, it automatically switches to a CPU path that gives the same result.
  • Diffuse, Halation, Sharpen, Chromatic Aberration, Lens Distortion, and Edge Blur read neighboring pixels and add a render pass (marked 2-pass in Edit Look 2), so they're heavier than per-pixel modules. Texture is a per-pixel module, so it adds no pass, and because it's drawn in layer space, the texture is the same size at Full, Half, and Quarter resolution and in the render queue.
  • Each effect has its own LUT Bank, which holds up to 4 .cube files loaded with Film LUT and is saved in the project file (about 430 KB per LUT). The TMC ColorGrading LUTs folder in your Documents folder is shared with the original, and the Lumetri LUTs (Creative, Technical) from your After Effects installation also appear in the list.
  • Each slot uses 27 After Effects parameters (22 values and widgets, plus 5 fixed-height display rows), so a stack holds up to 16 modules to keep the Effect Controls panel responsive. If you need more, apply the effect a second time. Deleting a slot hides its keyframes instead of deleting them, and they come back when you put a module in that slot again.
  • This is an After Effects-only effect and declines to load in Premiere Pro and Media Encoder. On Windows, Edit Look 2 needs the Microsoft Edge WebView2 Runtime, which comes with Windows 11 and most Windows 10 systems. The effect follows the After Effects UI language and is also shown in Korean, Japanese, and Simplified Chinese, with all 334 look names translated.

Included in both Essential and Pro

Start with Essential for $99, or get all 26 with Pro for $199.