TMC Plugins
EssentialAlso in Pro

TMCToolbox

An all-in-one panel with 67 useful tools for your work

An After Effects tool plugin made up of the tool panels (Item), the Motion, Palette, Memo, and Settings panels, and the Ring (Pie Menu). The 67 tools and their dedicated panels install as a single plugin file and make motion graphics and animation work more efficient and convenient.
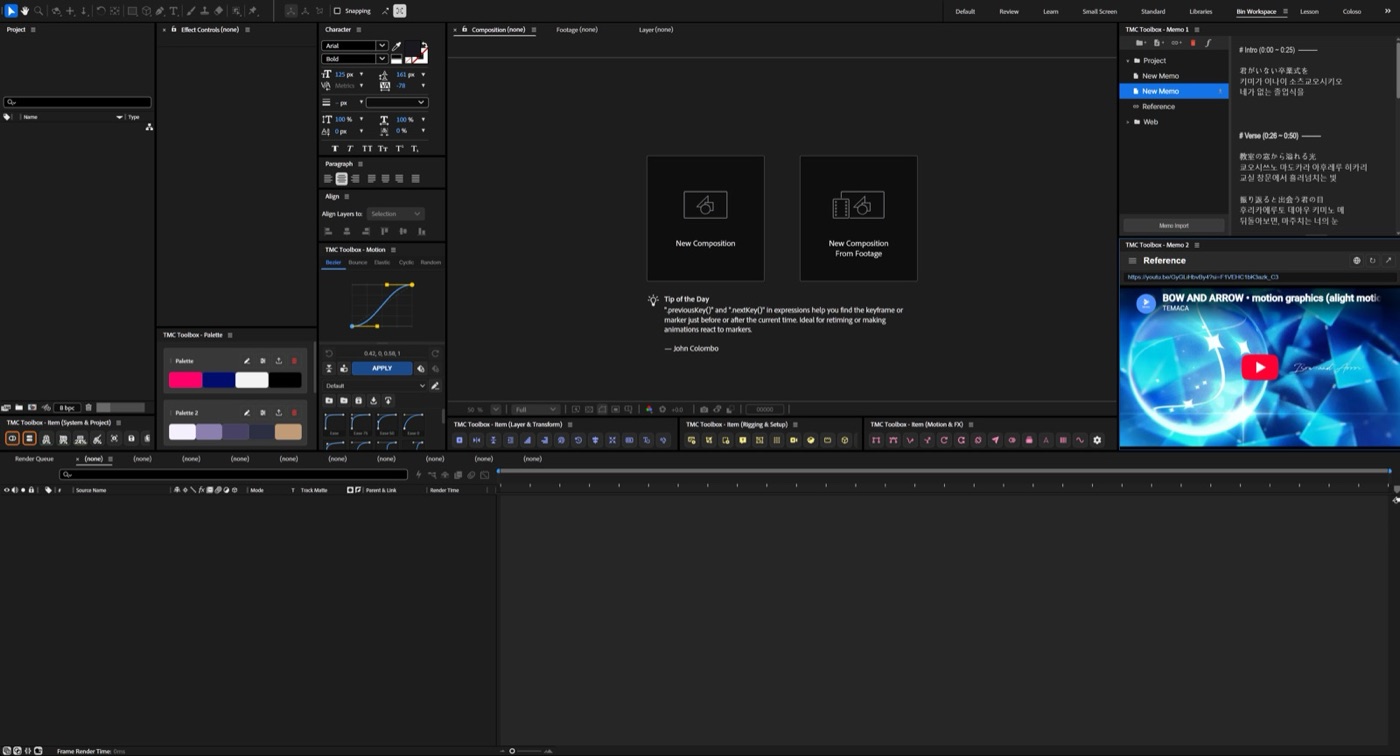
Window menu
Window › TMC Toolbox
Acceleration
CPU (works without a GPU)

Key features

01

67 tools in 4 categories

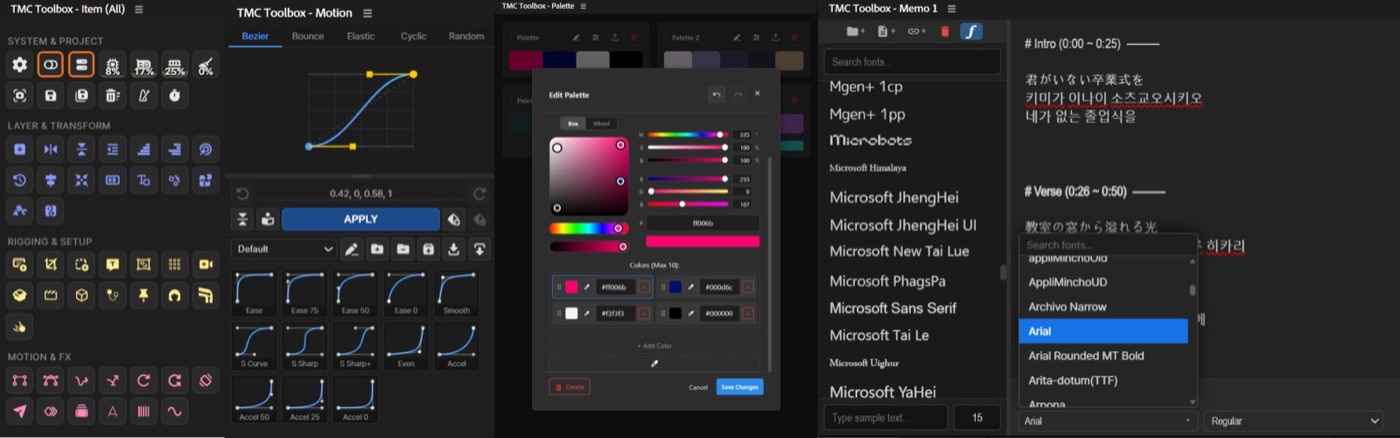
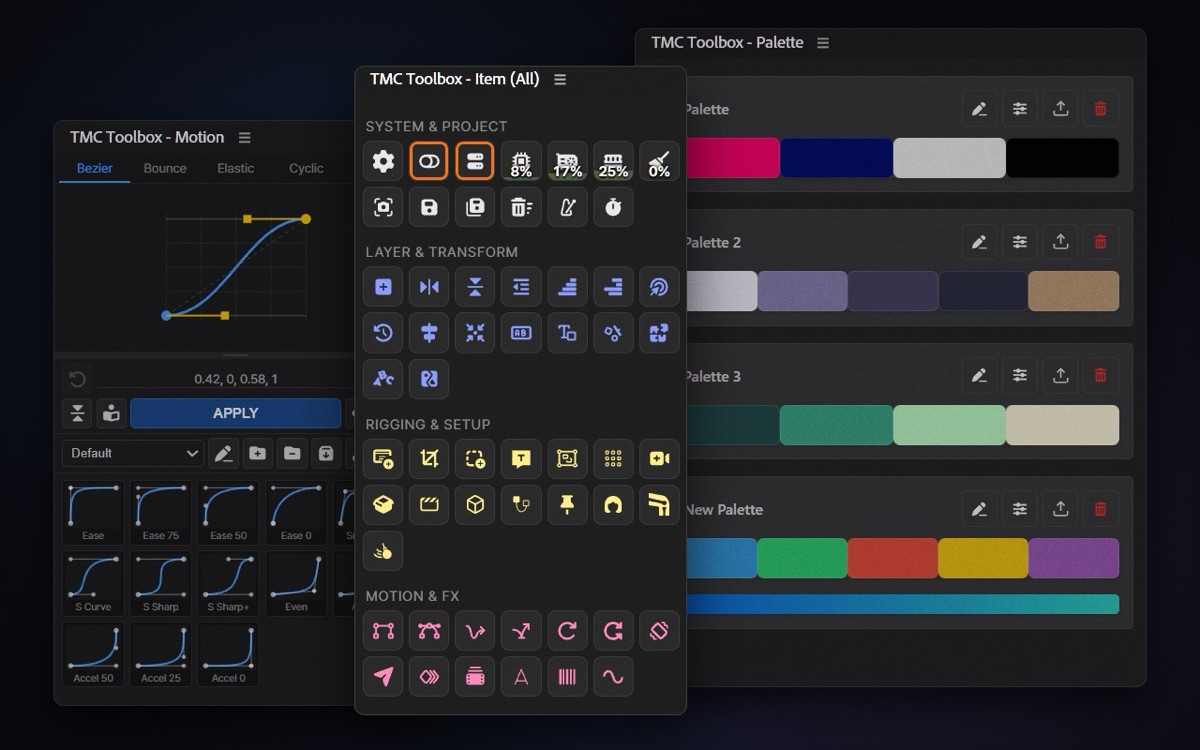
The tools are organized into System & Project, Layer & Transform, Rigging & Setup, and Motion & FX. Show them all in one panel, or dock a separate panel for each category.

02

Ring (Pie Menu) and effect search

Press Space+Tab and 8 tools you use often appear in a circle at the mouse position. Start typing in the Ring to find any installed effect by name and apply it.

03

Tools for MV work

It includes tools that came out of real needs in MV production, such as BPM Marker for placing markers on the song's beat, Text Decompose for splitting text one character at a time, and Frame Drop for a choppy anime feel.

04

Customizable button layout

Change the button size, spacing, and number of columns, hide the tools you don't use, and drag to change the order. The panel colors follow After Effects' light or dark theme automatically.

05

Motion, Palette, and Memo panels

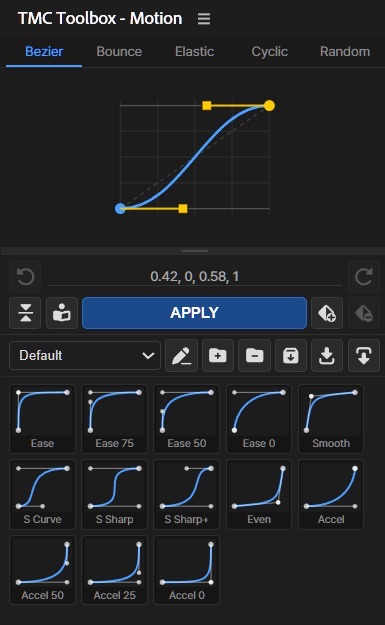
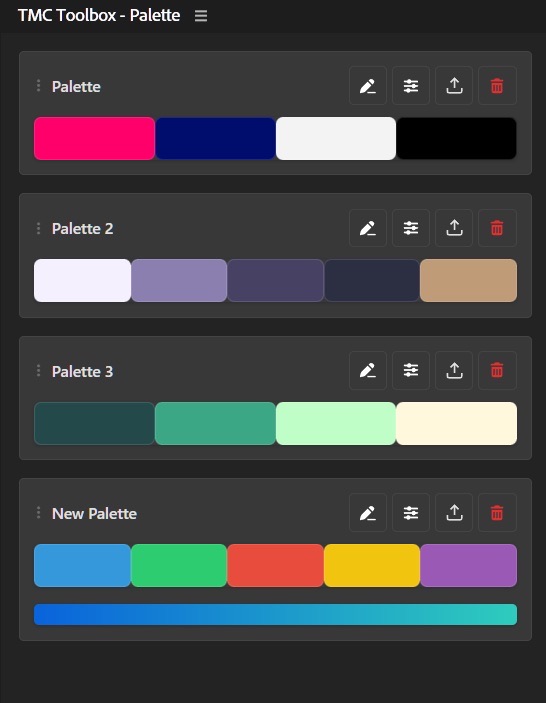
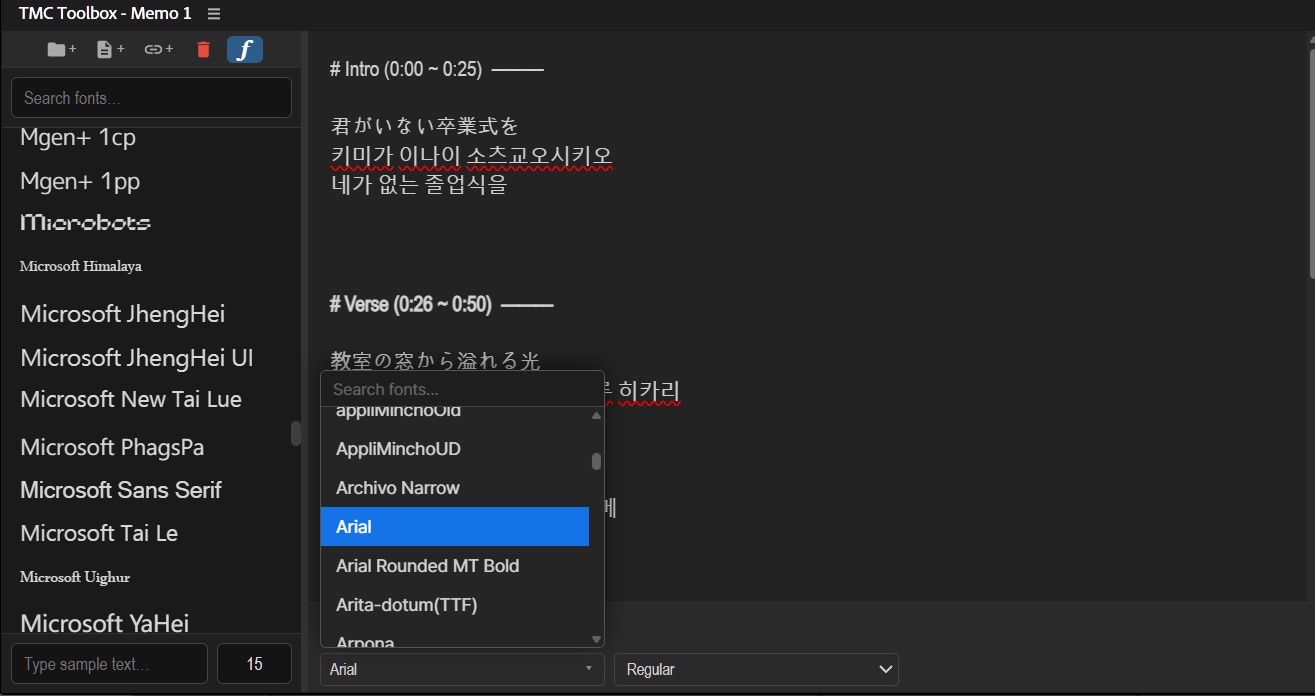
A Bezier easing graph editor (Motion), color palette and gradient management (Palette), and a notepad for keeping lyrics and references on screen (Memo, Pro only) each come as a separate panel.

06

CPU, GPU, and memory monitors

See CPU, GPU, and memory usage and the disk cache right in the panel, and click to clear the cache. You can also turn Multi-Frame Rendering on or off or switch renderers with a single button.

Quick start

Follow these steps in order the first time.

  1. Install TMC Toolbox from TMC Hub and restart After Effects.
  2. Open the TMC Toolbox panel from the Window menu and dock it wherever you like. You can also open the per-category Item panels separately and spread them out.
  3. Select a layer or keyframe and click a tool button. Hover over a button to see the tool's name.
  4. Press Space+Tab to open the Ring at the mouse position. To find an effect, just type its name while the Ring is open.
  5. In the Settings panel, set the button size, spacing, and number of columns, and hide the tools you don't use to arrange your own grid.
  6. It's handy to dock these panels as well: Motion for easing, Palette for colors, and Memo (Pro) for lyrics and references.

Ring (Pie Menu)

Press Space+Tab and a circular menu opens right at the mouse cursor. Run the tools you use often without moving the mouse over to a panel, and find effects by name and apply them.
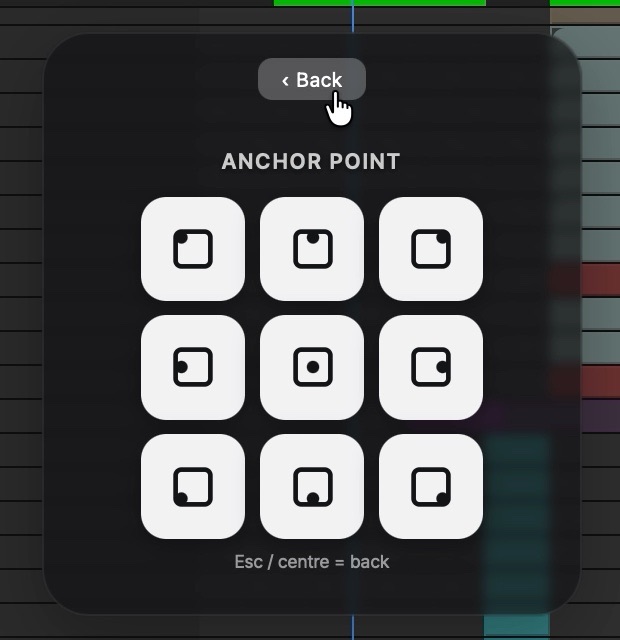
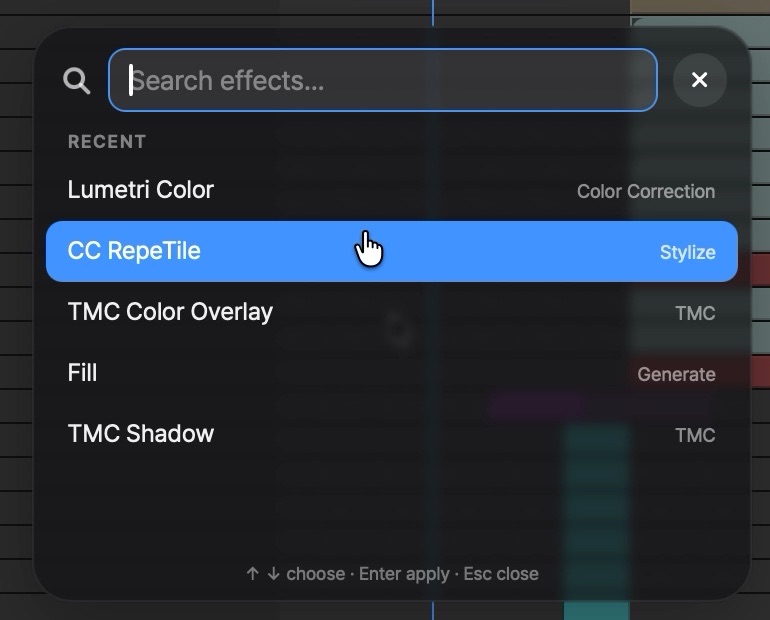
  • Press Space+Tab to open the Ring at the cursor. On a Mac you can press the two keys in either order; on Windows, hold Tab and then press Space. You can change the shortcut in Settings.
  • Click a button, or keep holding the keys, move over a button, and release. The tool runs right away. You can also choose with the number keys 1–8.
  • With Anchor Point, Align Position, and Paragraph Align, you pick the position or alignment right inside the Ring, without a dialog box.
  • Click the magnifying glass in the center, or start typing while the Ring is open, and it switches to effect search. It searches every installed effect, and pressing Enter applies it right away. Recently used effects are listed first. You can type in Korean or Japanese, and search by English effect names as well.
  • Choose the tools for the 8 buttons, the Ring size, and the background blur and dimming in Settings › Ring.
Anchor Point: pick one of 9 positions inside the Ring.
Effect search: recently used effects come first.

Panels

Item (All)

Shows all 67 tools in a single panel.

Item × 4 (by category)

Opens System & Project, Layer & Transform, Rigging & Setup, and Motion & FX as separate panels. You can keep just the categories you use most close to where you work.

Ring (Pie Menu)

A circular menu that opens at the mouse position when you press a shortcut. Run tools without moving the mouse over to a panel, and search for effects and apply them right away.

  • Space+Tab (change it in Settings)
  • 8 tool slots, effect search by name
  • Adjustable Ring size, background blur, and dimming

Motion

A graph editor where you shape a Bezier easing curve by hand and apply it to the selected keyframes.

  • 5 graph modes
  • Save and apply easing presets

Palette

Save the color palettes and gradients you use often and apply them right away.

  • Save palettes and gradients
  • Pick colors from the screen

Memo 1 / 2 / 3Pro

A memo panel for writing down lyrics or project notes and pulling them up when you need them. The three panels share the same content, so you can keep them open in different places around your workspace.

  • Organize notes into folders and documents, and set font, color, size, and weight
  • Font Preview, which shows your text in several fonts
  • Open web references such as a Notion page or a YouTube playlist
  • Export and import memos

Settings

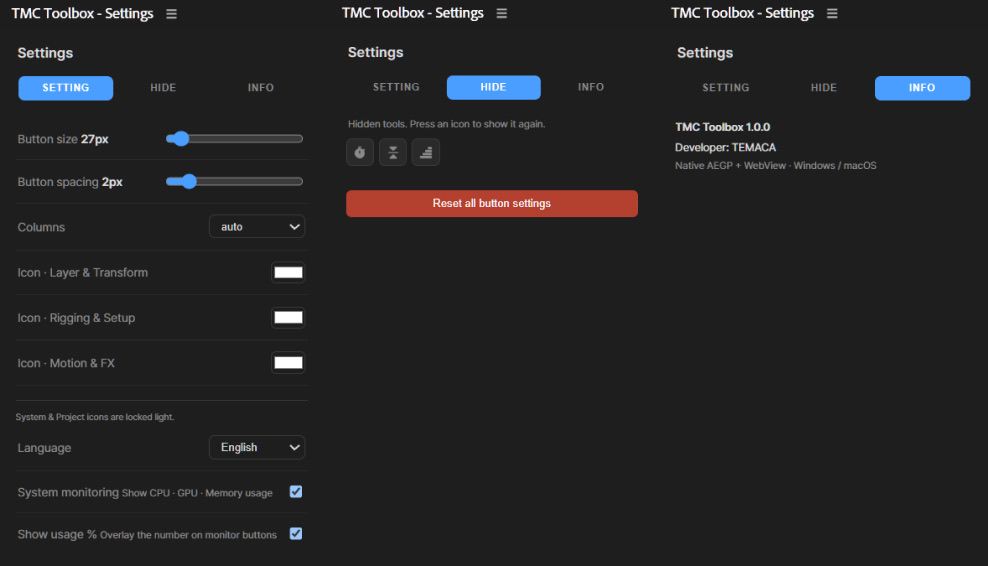
Manage global settings such as button size, spacing, color, and language, bring back hidden tools or reset to defaults, and check version info, all in one place.

67 tools

These are the tools in the Toolbox Item panel. You can also open them as separate panels by category.

System & Project 17

Preferences & Info
Changes Toolbox's button size, spacing, color, and language, brings back hidden tools, and shows version info.
Multi-Frame Rendering On/Off
Turns Multi-Frame Rendering on and off with one button. The icon color shows the current state.
Renderer Switcher
Switches the composition renderer and GPU acceleration mode right away.
Change Bit Depth
Changes the project's color depth to 8, 16, or 32 bpc.
CPU Usage
Shows live CPU usage in the panel.
GPU Usage
Shows live GPU usage in the panel.
RAM Usage
Shows memory usage. Click it to clear the memory cache.
Disk Cache Purge
Shows disk cache usage. Click it to clear the disk cache.
Preview Screenshot
Saves the preview currently on screen as an image file.
Import Master NEW BETA
Pick a folder and it imports the files inside with the folder structure intact. PSD and AI files come in as editable compositions, and image sequences at the frame rate you choose, all in one go.
Folder Setting NEW
Sets up a predefined folder structure in the project right away. Ctrl+click to edit the folder structure.
Replace Layer NEW BETA
Swaps in the revised version when the original PSD or AI file changes. It replaces only the sources of layers with matching names and keeps pins, expressions, keyframes, and parenting as they are.
Save
Saves the project.
Save As
Saves the project under a new name.
Remove Unused Footage
Cleans out footage the project isn't using.
BPM Marker
Places a marker on every beat based on the song's BPM. The markers give you a reference for cutting and animating to the beat.
WorkLog
Automatically logs your working time for each project so you can review it.

Layer & Transform 20

Fit Solid Layer
Creates a solid layer that exactly fits the composition size.
Flip Horizontal
Flips the selected layer horizontally.
Flip Vertical
Flips the selected layer vertically.
Layer Shifter
Moves the selected layers to the current-time indicator (playhead), keeping their spacing.
Step Shifter
Offsets the selected layers one after another in a staircase pattern.
Shuffle Shifter
Shuffles the selected layers and spaces them at random intervals.
Target Layer
Takes one layer as the reference and applies moves, parenting, and track mattes in one step.
Time Reverse
Reverses the selected layer in time.
Align Position
Aligns layer positions.
Anchor Point Center Align
Moves the anchor point to any of 9 positions.
Paragraph Align NEW
Switches a text layer's paragraph alignment to any of 7 options right away.
Source Text to Name
Renames a text layer to the text it contains.
Text Decompose (Layer)
Splits text into separate text layers, one per character.
Text Decompose (Shape)
Splits text into shape layers, one per character. Ctrl+click splits it by stroke instead, and Ctrl+Shift+click also adds an animation that draws the strokes in each language's stroke order (beta).
Shape Merge NEW
Combines two or more shape layers into one layer. The original layers are kept.
Shape Separate NEW
Splits the shapes inside one shape layer into separate shape layers, one per shape.
Vector to Path NEW
Converts Illustrator (.ai) and SVG files into editable shape layers. SVG conversion works in After Effects 2026.0 or later.
Layer Scatter
Scatters layers by randomizing their position, rotation, scale, and opacity.
One Text Animation
Uses Text Animator to build character motion on a single text layer.
Image to Shape
Converts an image layer into a shape layer.

Rigging & Setup 17

Auto Composite
Applies CC Composite automatically.
Comp Crop
Crops the composition to its non-transparent area.
Smart Add Null
Creates a null that automatically links the selected layers.
Add Text Layer
Adds a text layer.
Add Adjustment
Adds an adjustment layer.
Add Grid
Creates a guide grid layer.
Camera & Null
Sets up a camera and a control null in one step.
Parallax
Arranges layers in Z depth while keeping their on-screen size the same.
UnPrecomp
Pulls the layers inside a precomposition back out.
Cinematic LetterBox
Creates a cinematic letterbox. Includes 8 aspect ratio presets.
Box Space
Builds a 3D cube-shaped space out of compositions.
Link Rope
Creates a rope line that connects two layers.
Pin Control
Creates a control guide layer for each puppet pin.
Wave Bone
Rigs the selected puppet pins so they sway naturally, like a wave.
Joint Bone
Applies IK rigging to the selected puppet pins.
Physics Rigging
Applies real-time physics rigging to puppet pins.
Rigid Layer NEW
Drops the selected 2D layers and lets them collide according to physics, then bakes the result into keyframes. You can set the physical properties of each object separately.

Motion & FX 13

Keyframe Linear
Sets the selected keyframes to Linear.
Keyframe Bezier
Sets the selected keyframes to Bezier.
Elastic Key
Adds a springy Elastic motion after the keyframe.
Bounce Key
Adds a bouncy Bounce motion after the keyframe.
LoopOut Cycle
Applies LoopOut Cycle so the keyframes repeat.
LoopOut Pingpong
Applies LoopOut Pingpong so the keyframes go back and forth.
Smart Wiggle
Applies Wiggle to the selected property.
Follow to Path
Makes a layer move along a path.
Motion Baker
Bakes animation made with expressions and the like into keyframes.
Frame Drop
Adds frame drops to the selected property for a choppy, anime-style feel.
Slim Text
Makes text thinner.
Easy Flicker
Adds a flicker.
Wave Path
Creates a path that ripples like a wave.

Practical tips

  • When you start work on an MV, place beat markers with BPM Marker first. It makes it easier to time your cuts and motion.
  • The Ring holds up to 8 tools you use often. In Settings › Ring, change the tool on each button to build your own Ring.
  • Keep lyric subtitles in the Memo panel and copy them from there, so you don't have to switch windows every time you make a text layer. You can also use Font Preview to pick a fitting font in advance.
  • For per-character animation, split the text with Text Decompose (Layer), then use Step Shifter to stagger the start times.
  • If rendering slows down, clear the caches with RAM Usage and Disk Cache Purge, then check your settings right away with Multi-Frame Rendering On/Off and Renderer Switcher.

Where to use it

  • Beat-synced markers and per-character type animation for a lyric MV
  • Placing puppet pins on a character illustration and rigging the hair and clothing to sway
  • Motion graphics setups that align many layers at once and offset them in time

Pairs well with

Technical notes

  • It's a native After Effects plugin (AEGP) with a web-based panel on top, so you don't need to keep several script windows open.
  • The interface is available in Korean, English, Japanese, and Simplified Chinese, and it follows the light or dark color theme set in After Effects' Appearance preferences.

Included in both Essential and Pro

Start with Essential for $99, or get all 25 with Pro for $199.